How to Apply Wall Murals and Wall Stickers | Step-by-Step Guide
» How to Apply Wall Stickers?
» How to Apply the Multicolor Children's Wall Stickers?
» How to Apply Wall Murals?
» How to Bring Beauty and Style to Your Home with Posters & Canvas Prints?
![]()
How to Apply Wall Stickers?
Transform any space with ease and style! Applying wall stickers has never been so simple. I'll show you how to do it in a relaxed, modern, and hassle-free way, ensuring a final result that brings beauty to your living room, bedroom, or children's room.
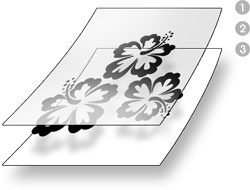
The Wall Stickers consist of three parts:
- (1) Transfer Film (a transparent film that helps apply the sticker)
- (2) Wall Stickers (the design itself, which will be applied to the surface)
- (3) Protective Film (a backing layer that protects the adhesive before application)
Care and Requirements:
If the wall has been recently painted, wait 3 to 6 weeks before applying (depending on the season, temperature, and humidity) to ensure perfect adhesion. Although the paint may feel dry to the touch within hours or days, the curing process is slower and can take weeks. During this time, the paint continues to release compounds and settle. Applying the sticker on uncured paint may compromise adhesion, leading to bubbles or peeling.
Where to Apply?
Wall stickers can be applied to any smooth, flat surface such as walls, doors, mirrors, tiles, glass, and even furniture! Perfect for personalizing cabinets, kitchens, or any space that needs a special touch.
Step-by-Step Guide to Applying Wall Stickers: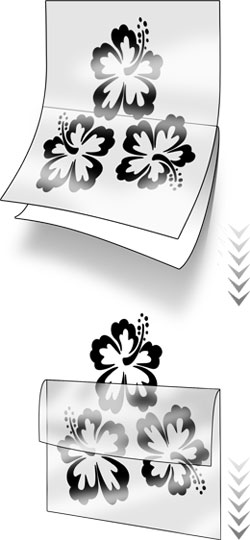
- Prepare the Surface: Ensure the surface is clean, dry, and free of any grease or moisture. This will guarantee that the sticker adheres well and lasts longer.
- Position the Sticker: Mark the surface with a few light reference lines to help position the sticker correctly. This prevents it from being crooked and ensures a perfect look.
- Prepare the Sticker: Place the sticker on a table with the transfer film facing up and gently press it with a soft cloth to ensure it sticks well to the film.
- Start Applying: Lift about 5 cm of the protective film and fold it down. Position this exposed part on the surface and secure it. You can use painter’s tape to help hold the sticker in place.
- Apply Slowly: Gradually remove the protective film while pressing the sticker against the surface with a soft cloth, always moving from the center to the edges and applying pressure for perfect and strong adhesion, avoiding air bubbles.
- Finalize the Adhesion: Once the entire protective film has been removed, go over the entire surface with the cloth, applying pressure to ensure a good bond with the wall, paying extra attention to the edges and corners.
- Remove the Transfer Film: Carefully begin to remove the transfer film, pulling it slowly and keeping it parallel to the wall surface. If you notice the sticker coming off with it, press it back down and continue slowly and carefully until the transfer film is completely removed.
- Final Adhesion: To ensure perfect and lasting adhesion of the sticker on the wall, go over the entire surface, edges, and corners again with a soft cloth, applying firm pressure.
Done! Now you have a beautiful decorative silhouette on your wall. Whether in the living room, bedroom, or your child's room, the final result is always a touch of art and personalization that transforms the space, adding life and personality. Enjoy and have fun decorating!
![]()
How to Apply the Multicolor Children's Wall Stickers:
Transform your baby's room into a true fairy tale with our beautiful and colorful repositionable decorative wall stickers. Our wall stickers bring joy, magic, and a unique touch of beauty, creating an enchanting and cozy environment for the little ones. Easy to apply and even easier to love, they are perfect for sparking children's imaginations!
Care and Requirements:
If the wall has been recently painted, wait 3 to 6 weeks before applying (depending on the season, temperature, and humidity) to ensure perfect adhesion. Although the paint may feel dry to the touch within hours or days, the curing process is slower and can take weeks. During this time, the paint continues to release compounds and settle. Applying the sticker on uncured paint may compromise adhesion, leading to bubbles or peeling.
- Prepare the Sticker: Each sticker consists of the colorful design (2) and a protective film (3) on the back.
- Position the Sticker: Place the sticker, still with the protective film, on the wall exactly where you want to apply it. This step helps visualize the ideal positioning before the final application.
- Peel Back a Bit of the Protective Film: Lift about 5 cm of the protective film and fold it down, revealing the adhesive side of the sticker.
- Adhere the Sticker: Carefully start pressing the sticker evenly against the wall, moving your hands or a soft cloth from the center outward to avoid air bubbles. At the same time, gradually peel off the protective film until the entire adhesive surface is fixed to the wall.
- Completely Remove the Protective Film: In the end, the film will be completely removed, leaving the sticker perfectly adhered to the wall.
The best part is that our decorative stickers are repositionable during application! This means you can reposition the sticker without damaging the wall or losing adhesion, allowing for small adjustments in its placement.
Create an environment full of colors, dreams, and happiness. Each sticker is an opportunity to add a special touch to that cherished corner, bringing beauty and a smile to the little ones, because their room should be a place where magic happens every day!
Practical Tips for Removing Vinyl Wall Stickers:
Want to give your wall a new look and remove the wall stickers? Here are some useful tips to make the removal process quick and safe:
- Prepare for Removal: To simplify removal, start by warming up the sticker. Use a hairdryer on medium heat and apply heat directly over the adhesive area. This will help soften the glue and make removal easier.
- Careful Removal: Begin by lifting one edge of the sticker. Pull slowly while keeping the hairdryer heating the still-adhered part. This reduces the risk of damaging the paint or wall surface, ensuring a smoother process.
- Avoid Adhesive Residue: During removal, some adhesive residue may remain on the wall. To address this, use a soft cloth dampened with cleaning alcohol or an adhesive remover. This will help leave the wall clean and ready for new decor.
- Be Careful with the Surface: If you notice the wall paint coming off with the sticker, stop and continue applying heat. This will further soften the glue and minimize the risk of damaging the wall.
- Final Cleaning: After removing the sticker, it is important to clean the entire surface. Wipe with a damp cloth to remove any dust or small residues, leaving the wall ready for the next decoration or a new coat of paint.
By following these tips, you can remove any wall sticker easily and safely, leaving your wall ready for new ideas and inspiring decor.
Ready to give your space a new look? Put these tips into practice and transform your home today! Our sticker collection is always growing, bringing incredible and themed ideas for your new decorative project.
![]()
How to Apply Wall Murals?
Self-adhesive wall murals are the perfect way to transform any room in your home or commercial establishment. Whether it's the living room, bedroom, children's room, or kitchen, they create a sophisticated look full of personality. They are easy to apply, with no need for glue—just peel and stick. Plus, they are repositionable, allowing you to make adjustments during application. The best part? Anyone can do it, hassle-free!
Care and Requirements:
If the wall has been recently painted, wait 3 to 6 weeks before applying (depending on the season, temperature, and humidity) to ensure perfect adhesion. Although the paint may feel dry to the touch within hours or days, the curing process is slower and can take weeks. During this time, the paint continues to release compounds and settle. Applying the adhesive on uncured paint may compromise adhesion, leading to bubbles or peeling.
Step-by-Step Guide to Applying Wall Murals: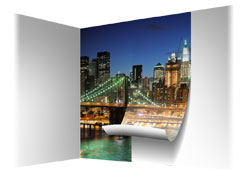
- Prepare the Surface: Ensure the wall is clean, dry, and smooth. Remove any dust, grease, or imperfections to guarantee good adhesion.
- Organize the Panels: Unfold the mural and lay out the panels on the floor in the correct order to get an idea of how they will look on the wall. Each panel is about 50cm/100cm wide to facilitate the work.
- Time to Apply: Start by progressively removing the protective film from the back of each panel as you apply the mural to the wall, starting from the top and moving downward. Using a soft cloth, apply even pressure from the center to the edges to prevent air bubbles. Once the first panel is applied, reinforce the pressure over the entire surface, paying extra attention to the overlapping corners and edges to ensure perfect adhesion. If any bubbles appear, press from the center outward until they disappear. Repeat this process for the remaining panels.
- Align the Panels: Apply the subsequent panels, carefully aligning each one and overlapping them by approximately 0.5 cm to ensure a perfect result without visible gaps. If repositioning is needed, simply peel and adjust.
- Finishing Touches: After all panels are applied, use a craft knife to trim any excess at the corners or base, leaving the mural neatly finished.
Tips for a Perfect Application:
- Items such as outlets and switches can be easily worked around. Simply turn off the electricity, remove the covers, apply the mural, and trim the excess.
- Application is even easier with two people, ensuring proper alignment and convenience.
- Our Wall Murals are washable! If needed, you can clean the entire mural with a soft damp cloth, keeping it looking perfect.
With our self-adhesive wall murals, transformation is instantaneous and the final result is stunning. Your living room, bedroom, children's room, kitchen, or any other space in your home, office, or business will gain life, style, and personality quickly and easily. Moreover, our wall murals can be removed very easily when you want to change the decor, without damaging the wall paint, leaving it ready for a new, beautiful wall mural. Just stick, admire, and when desired, renew!
![]()
How to Bring Beauty and Style to Your Home with Posters & Canvas Prints?
On our site, in addition to the incredible Wall Murals that transform any wall into a stunning backdrop, you can also purchase these images in smaller formats. We offer posters and canvas prints in five different sizes, perfect for decorating the living room, bedroom, or even the children's room, with a unique and inspiring artistic touch.
The canvas prints are produced on high-quality material, providing that authentic look of a work of art. You can choose to have them framed, or stretched onto a wooden frame (gallery wrap), a service available in many specialized stores. This technique further highlights the beauty of the image, creating an impactful piece that will make all the difference in your decor.
It is important to note that none of the posters and canvas prints come framed or gallery-wrapped. They are shipped rolled in a cardboard tube or box to facilitate delivery and maintain the integrity of the materials.
All posters and canvas prints are available in five different sizes, making it easy to find the perfect fit for your space. Whether it's a tranquil landscape for the bedroom, a vibrant scene for the living room, or a fun touch for the children's room, our options perfectly adapt to every environment.